flowchart TB
  IN1[/"S1 streets<br/>and junctions"/]:::data

  subgraph SIGNS["SIGNS"]
    IN2[/"City sign file"/]:::data --> P["POSTS<br/>installed, near a junction"]:::step
    DEC[/"Photo decisions"/]:::rule -.-> F
    P --> F["FIND THE STREET<br/>by position and meaning"]:::step
    F --> M["MOVES<br/>allowed or forbidden"]:::step
  end
  subgraph LIGHTS["LIGHTS"]
    IN3[/"Traffic-light file"/]:::data --> L["CLOSEST JUNCTION<br/>within 25 m"]:::step
  end
  subgraph SPEED["SPEED"]
    IN4[/"Speed-limit file"/]:::data --> SP["SAME STREET<br/>or same name nearby"]:::step
  end

  IN1 --> A["APPROACHES<br/>every way into a junction"]:::step
  A --> F
  IN1 --> L
  IN1 --> SP
  M --> J["CONTROL<br/>lights, all-way stop, stop, none"]:::step
  L --> J
  J --> O1[/"Rules for every junction"/]:::out
  SP --> O2[/"A limit for every street"/]:::out
  O1 --> T["TESTS"]:::test
  O2 --> T

  classDef data fill:none,stroke:#8a8a8a,color:#e6e6e6
  classDef rule fill:none,stroke:#8a8a8a,stroke-dasharray:4 3,color:#a6a6a6
  classDef step fill:none,stroke:#e6e6e6,color:#e6e6e6
  classDef out fill:none,stroke:#e6e6e6,stroke-width:2px,color:#ffffff
  classDef test fill:none,stroke:#fe83cc,color:#fe83cc
  style SIGNS fill:none,stroke:#3a3a3a
  style LIGHTS fill:none,stroke:#3a3a3a
  style SPEED fill:none,stroke:#3a3a3a
How S3 is built and tested
Blueprint
Approaches
A sign speaks to drivers arriving from one direction, so S3 starts from the approaches: each segment end, as a car drives towards the junction. For each one it records the arriving car’s heading, whether the one-way rules let a car arrive or leave along it, the segment’s length, and whether the junction is an exit, where the edge street meets the rest of the city. A one-way street pointing away from a junction gets no rules there, since no car arrives that way.
How a stop sign finds its street
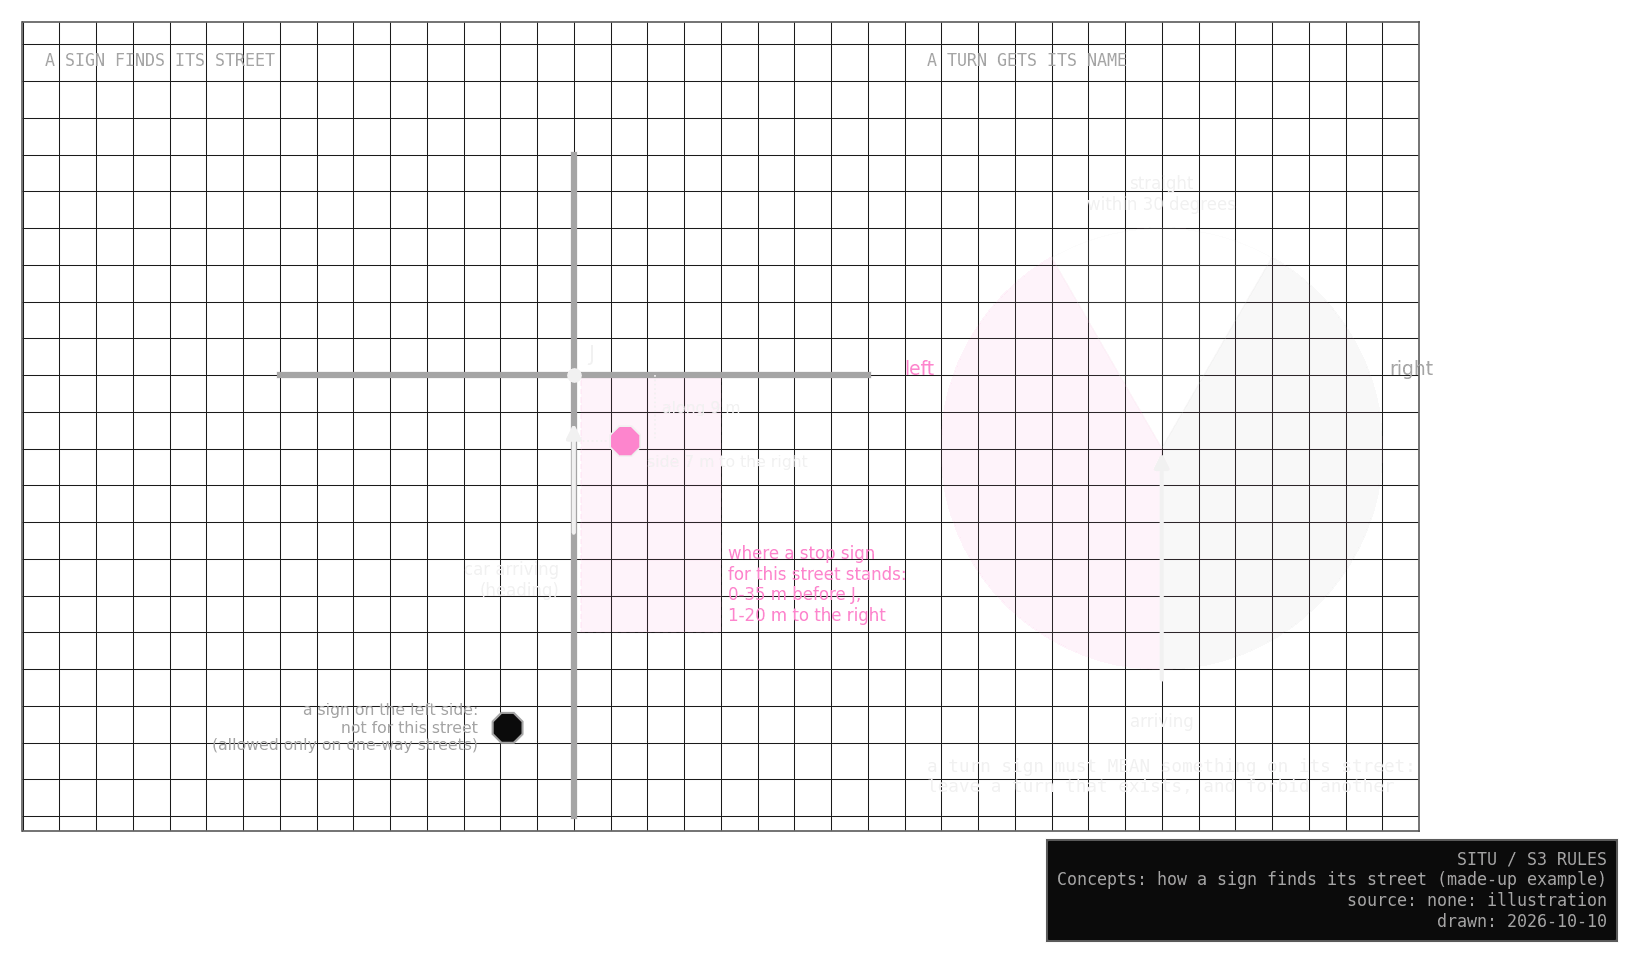
In Québec a stop sign usually stands on the right of the street, just before the junction, and S3 relies on that. A post fits an approach when it stands up to 35 m before the junction and 1 to 20 m to the right of the centre line, on that same segment: a post further back belongs to the previous junction, which matters on short pieces like the 20 m stretches where Wellington splits in two. When several approaches fit, the one closest to the usual spot (about 7 m to the right, near the junction) wins, and S3 marks the link as less sure. On a one-way street signs often stand on both sides, so a post on the left is accepted too. A sign that fits nothing goes on the list to check.
How a turn sign finds its street
Turn signs often stand across the junction or on a median, so their position is a weak clue. S3 adds a second one: what the sign would mean on each nearby street. At J027, “left turn only” on Rue Chatham keeps the left onto William and removes the right. On Rue William a car can only go straight on, since Chatham is one-way towards William, so the same sign would remove the only move and trap every car. The signs therefore belong to Chatham.
A turn sign thus belongs to a street only when it keeps at least one of its moves and removes at least one. When several streets pass, the post decides first: panels on one post usually face the same drivers, so a turn sign that means something on the street of a stop sign on the same post goes there. Position decides next, with a sign before the junction, on the right, preferred, and one past the junction used only when nothing before it fits.
Two contradicting panels on one post, like “straight only” above “left or right only”, stand back to back, so the second one looks for another street. If none fits, it goes on the list, since only a photo can tell which way each faces. A turn sign at an exit is ignored, because the streets it points to lie outside the network. If the turn signs on one street together leave no move at all, S3 sets them aside and keeps every move open; after the photo checks, no street is in that state.
My first version placed turn signs by position alone, like stop signs, and left many streets with no way out (X5 repeats it).
To name a turn, S3 compares the arriving heading with the direction of the street the car leaves along. Less than 30° either way counts as straight on, and anything sharper is a left or a right (Chatham onto William turns 89° to the left). S3 never makes a U-turn.
Decisions from photos
For the few signs I could not place from the desk, I wrote down what Mapillary’s street-level photos show (S3 checks with photos). S3 reads those decisions before its own matching, so a photo outranks a guess. The city’s file is never edited, so removing a decision brings back S3’s own matching.
No-entry signs
S1 already takes its one-way streets from the city, so S3 uses no-entry signs only to check S1. A sign agrees when a street near it is one-way towards the junction, or closed to cars. When only a path I added in S1 explains it, it goes on the list, because my own decision cannot confirm itself.
Traffic lights
The city’s light file gives each light a point and the names of the streets it stands between. S3 gives each light to the closest junction within 25 m. A light 25 to 100 m from every junction goes on the list, since it may mark a junction S1 is missing. The names give a second check: “Montagne / Wellington” should stand where Rue de la Montagne meets Rue Wellington.
Speed limits
The city’s speed file uses the same street ids as S1, so most segments simply take their own limit. Seven segments have a limit of 0, and all seven are closed to cars, so S3 reads 0 as “no limit given”. Three Wellington pieces were redrawn after the file was made and have new ids. For those, S3 takes the speed of same-name lines lying along the segment within 5 m, when they cover nearly all of it and agree. I chose 5 m by looking at those three segments, as the smallest distance that covers the two short pieces where Wellington splits; a stress test shows what other distances give.
Assumptions
These are my choices for the simulation. None of them comes from the data.
| Assumption | Why | Where it could be wrong |
|---|---|---|
| stop signs stand on the right | the usual placement in Québec | a median or a wide corner |
| a turn sign must mean something on its street | signs are put up to change what drivers do | a sign truly redundant on the ground |
| panels on one post face the same drivers, unless they contradict | the usual way posts are dressed | a post serving two streets without contradiction |
| a photo decision outranks the matching | the photo shows the street; the matching guesses | a photo older than its sign (why P03 stays open) |
| no U-turns | no data on where drivers make them | a driver who missed a turn |
| time-limited turn rules hold at all hours | S3 has no clock until S5 Rhythm | rush-hour bans on 3 streets |
| temporary lights count as lights | the city lists them with the others | Notre-Dame and Murray (J059), if removed |
| a new street piece keeps the limit of the old line beneath it | same street, same name | the three redrawn Wellington pieces |
Tests
Ten checks
Each check asks one plain question of the rules S3 writes. Eight must pass, and all eight do; the other two only report. The Lab shows the latest results.
| Question | Answer | |
|---|---|---|
| T1 | Does every street a car can arrive along have exactly one approach? | yes |
| T2 | Does every sign get a street, or a written reason it has none? | yes |
| T3 | Does every stop sign stand where a driver would see it? | yes |
| T4 | Do the turns fit the street layout, with a reason for every forbidden turn and no street left a trap? | yes |
| T5 | Does each junction’s control agree with its approaches? | yes |
| T6 | Do the no-entry signs agree with the city’s one-way streets? | report: none of the 78 disagrees, and 67 agree |
| T7 | Does every rule cite the signs behind it? | yes |
| T8 | How sure is each link between a sign and a street? | report: see S3 Rules |
| T9 | Does every light stand within 25 m of its junction and name at least one of its streets? | yes |
| T10 | Does every speed match the city file, with a reason for every gap? | yes |
A disagreement in T6 goes on the list of places to check, because I cannot tell from the desk which source is right. The photos explained the last four.
TipTesting the tests
A test that always passes proves nothing. Before trusting T9 and T10, I moved one light by 30 m and changed two speed cells, one from 30 to 50 and one empty cell to 0. T9 caught the light and T10 caught both speeds. Then I put the files back.
Stress tests
Each stress test changes one thing on purpose and counts how many rules move. Run twice on the same input (X1), S3 gives identical results.
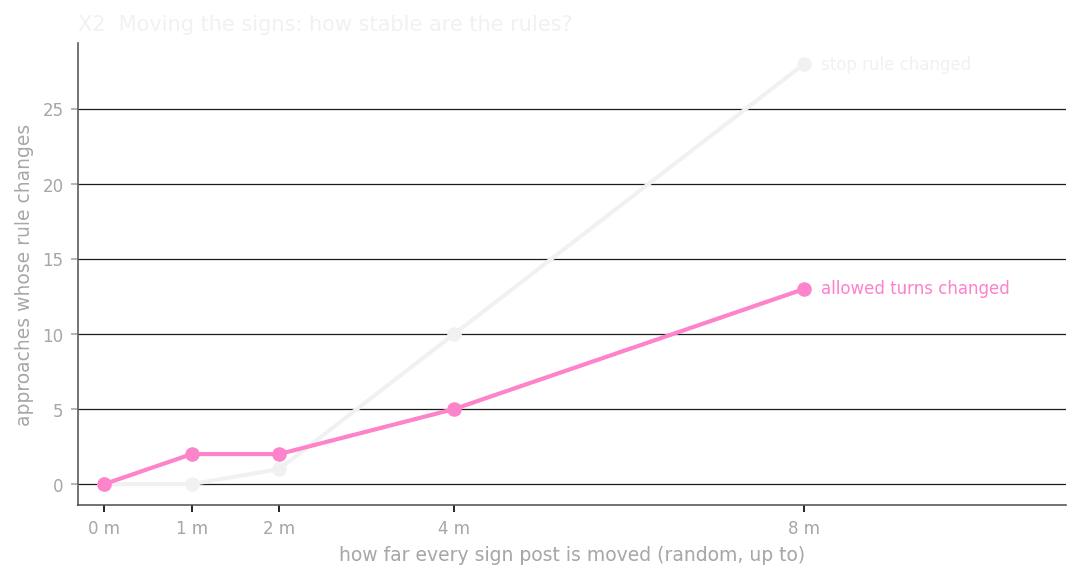
X2 moves every sign post at random, by up to 1, 2, 4 and 8 m. Up to 2 m almost nothing changes. Beyond that, ten streets change their stop at 4 m, and 28 at 8 m. So the city’s sign positions would have to be off by more than 2 m to shift the stop rules. I do not know yet how accurate they are, and a few corners are worth checking on the ground.
X3 and X4 change how far before the junction, and how far to the right, a sign may stand. Both sit on a plateau: a little more or less than my 35 m and 20 m changes nothing, and only the tightest values lose signs. Most signs without a street stand at exits or beyond the edge.
X5 places turn signs by position alone, as my first version did, and leaves 25 streets with no turn at all. With the meaning test and the photo decisions, none is left that way.
X6 changes how close a light must be to its junction. From 25 to 40 m the same 31 junctions get lights. At 5 m eight are lost, mostly on Robert-Bourassa and on edge streets, where the city places the light 5 to 10 m away on a wide corner. At 80 m, lights start landing on the wrong junctions.
X7 changes how far a same-name line may lie when a street is missing from the speed file, and it is the one setting with no plateau below it. Under 5 m, two Wellington pieces open to cars lose their limit; from 5 m on, all three redrawn pieces are covered, which is what I chose 5 m for (speed limits). Autoroute 10 and its ramps are never in the file, at any distance.